Food
How To Bake Sugar Bread

Selecting Recipe and Ingredients is very important in making bread. The freshest, best-quality ingredients are required for successful bread baking. There is no way to convey this enough!
Most bread recipes start with a combination of flour, water, yeast, and salt. The addition of anything else increases the flavor and distinguishes one delicious bread from another. Every component matters while making a loaf of bread. The caliber of each item and how it will impact your dish must constantly be considered.
Flour
Bread is made from flour. Although there are loaves made without flour, yeast, sugar, and even salt, there are none without salt. Any milled cereal grain can be used to make flour (or rarely groundnut meal), but wheat flour is the one most frequently used to make bread. There are several distinct types of wheat flour, including whole wheat, bread flour, and all-purpose flour.
Use only the kind of flour specified in the recipe. Every kind of flour has a unique behavior when mixed with various additives and settings.
Types of Flour
a. All-Purpose Flour:
All-purpose flour is made from the interior of the kernel, which lacks the bran and germ, and is finely ground. It is a mixture of soft wheat and hard wheat with varying levels of gluten. The most popular type of flour used in bread baking is all-purpose flour. It is simple to work with and include. There are two types of it: bleached and unbleached. Since they frequently behave similarly in recipes, the choice to use one over the other is typically based on the baker’s personal preferences. Either chemically or naturally can be used to bleach flour.
b. Bread Flour
A particular flour known as bread flour is required in several recipes. Over 99% of bread flour is made of hard wheat, plus a minor percentage of malted barley flour, vitamin C, or other bread-improving ingredients
c. Whole Wheat Flour:
Wheat germ is present in whole wheat flour, giving it a richer flavor as well as a higher nutritional and fat content. Whole wheat flour is used to make a variety of delectable loaves.
Yeast and Yeast Storage
The numerous small living organisms that make up baker’s yeast turn the fermentable carbohydrates in the dough into carbon dioxide and ethanol. In order for yeast to work, it must be fresh because it is a frequent leavening agent used in bread baking that makes the dough rise and become less dense and more airy. In other words, if the yeast is dead, the sugars won’t be activated, and the dough won’t rise.
Sugar
Use the specified amount of sugar, just like you would flour. Yeast is activated with the aid of sugar. When sugar and yeast are combined in warm water, the yeast eats up the sugar and breaks it down into ethanol and carbon dioxide, which causes the yeast to activate and rise. In some recipes, honey can serve the same function.
Eggs
Utilize only fresh eggs. Before each usage, have a look at the expiration date. Never substitute little eggs for large ones if the recipe calls for them. The equilibrium between the dry and wet ingredients will be upset by the size discrepancy. In general, it’s a good idea to put the eggs you’ll be using in your recipe in a bowl and let it out on the counter for an hour or two so they can get to room temperature. If you beat cold eggs, less air will be able to enter the mixture.
Put the tools and ingredients together
Among the equipment required for making bread are:
a. Food Scale
The secret to precise baking is a food scale. One of the fundamental principles of baking is that weight measurements are preferable to volume measurements.
b. Mixer
For first, you can choose to use your hands, but as demand rises, a stand mixer is inevitable.
c. Bench Scraper
You can use a bench scraper to shape and produce tension in your loaves prior to proving, wipe a flour- and moisture-covered, sticky work surface, or cut up sections of dough.
d. Bread Pan
The finest pan for baking sandwich bread is a nonstick standard bread loaf pan.
e. Oven
Oven types include electric, gas, and charcoal. On the latter, more
Please be aware that some of these items can be replaced with items you already have at home, as you will discover in some of our movies.
Count the components
You must be able to repeat your recipe and achieve consistent results in order for it to be successful.Here measuring becomes important.
You must be able to repeat your recipe and achieve consistent results in order for it to be successful.Here measuring becomes important.
You’ll need exact proportions, a decent mixing technique, and persistence for the yeast to work on the dough to get your bread on the road to a healthy rise. Here’s how to start making some fantastic homemade bread.
Of course, weighing the ingredients is the first step in creating bread. This is crucial since variations in ingredient quantities can result in substantial changes to the final loaf of bread. Ingredients can be measured in two different ways: by volume (cups and teaspoons) or by weight (ounces or grams). Weighing is preferred because it is more reliable (especially with flour,
Activate the yeast
You must leave dried yeast in a bowl of warm water (37–43 degrees) with a pinch of sugar for 10–15 minutes to activate it. If you combine warm milk and sugar, you can also utilize that. Baking uses yeast as a leavening agent, which causes bread and cakes to rise.
MIXING AND KNEADING
The dough needs to be kneaded after the ingredients have been measured. To stretch and strengthen the gluten in the dough, kneading includes pulling and pressing the dough. When water is added to flour, gluten, which is made up of protein strands, forms and gives bread shape. Bread rises because the protein stretches to make room for the bubbles created during fermentation.
Bread can be mixed and kneaded in four different ways: by hand, in a food processor, or in a stand mixer. Any approach will work for the majority of bread. While it is tempting to add too much flour when kneading by hand (which can dry up the dough), it is advisable to use a bread machine or stand mixer if you are working with a very sticky dough.
First proofing, please, first rise.
The majority of recipes require for the bread to double in size; depending on the temperature, moisture in the dough, the development of the gluten, and the ingredients used, this can take one to three hours. In general, the ideal atmosphere for bread rising is one that is warm and humid.
Every baker will have a different idea of how long things should rise because there are so many variables. The way and rate at which dough rises depends on a variety of factors, including the temperature of the water and the air, humidity, the size of the dough pieces, the shape of the dough, and the vessel in which the dough is placed.
Dough has generally been properly proofed when it has doubled in size. (The exception is dough that contains at least 50% whole wheat. due to everything
Slice and rework the dough.
The dough must be divided into the proper sections after the bulk ferment. This step can simply be bypassed if you have enough dough to make one loaf. Using a dough cutter or a big kitchen knife, remove the dough from the bowl and divide it into the necessary portions on a lightly dusted surface. To assure even amounts if you were selling the bread, you would need to scale (weigh) the dough.
permit a second rise, bake, and cool
The bread is more elastic and thus more difficult to deflate after the second proving. Second rises may greatly lengthen the time needed to produce a loaf of bread, but they may be necessary to provide the flavor and texture that characterize many common breads.
The dough is cut this time before doing this into the bread pan.
Theory-Building Session
Making bread is really easy. Basically, it involves these actions described below.
* Pick a recipe and an ingredient.
* Locate a workspace
* Put the tools and ingredients together.
* Compute the constituents’ quantities.
* Make the yeast active.
* Combine (using a food processor, electric mixer, hand mixer, or bread maker)
* Knead
* Permit first to rise
* Separate and sculpt the dough.
* Permit a second rise
* Set up the oven
* Bake
* Cool

Taco Bell is a fast food restaurant in the United States. Since 1962, when it was founded by Glen Bell in California, it has been serving different kinds of foods, including Mexican-inspired ones like tacos, burritos, nachos, quesadillas, and many others.
Taco Bell Menu
Taco Bell, as a multinational chain of fast food restaurants, has on its menu a lot of foods for its customers to choose from. Below is a Taco Bell menu in a restaurant near you.
Break Fast
| Food Name | Calories | Price |
| Cheesy Toasted Breakfast Burrito Bacon | 350 Cal | $1.99 |
| Cheesy Toasted Breakfast Burrito Sausage | 350 Cal | $1.99 |
| Cheesy Toasted Breakfast Burrito Potato | 340 Cal | $1.99 |
| Grande Toasted Breakfast Burrito Steak | 570 Cal | $4.89 |
| Grande Toasted Breakfast Burrito Sausage | 570 Cal | $4.59 |
| Grande Toasted Breakfast Burrito Bacon | 570 Cal | $4.59 |
| Grande Toasted Breakfast Burrito Combo | 730 – 1010 Cal | $7.39 |
| Breakfast Quesadilla Sausage | 510 Cal | $4.19 |
| Breakfast Quesadilla Bacon | 510 Cal | $4.19 |
| Breakfast Quesadilla Steak | 510 Cal | $4.59 |
| Breakfast Quesadilla Combo | 670-950 Cal | $6.79 |
| Breakfast California Crunchwrap | 640 Cal | $4.79 |
| Breakfast Crunchwrap Bacon | 670 Cal | $4.69 |
| Breakfast Crunchwrap Sausage | 750 Cal | $4.69 |
| Breakfast Crunchwrap Combo | 840 – 1120 Cal | $7.29 |
| Hash Brown | 160 Cal | $1.99 |
| Cinnabon Delights 2 Pack | 170 Cal | $2.49 |
| Cinnabon Delights 12 Pack | 1010 Cal | $7.19 |
| Premium Hot Coffee | 10 Cal | $2.19 |
| Hot Cinnabon Delights Coffee | 160 Cal | $2.69 |
| Regular Iced Coffee | 10 Cal | $2.19 |
| Iced Cinnabon Delights Coffee | 160 Cal | $2.69 |
New
| Food Name | Calories | Price |
| 10 Piece Crispy Chicken Nuggets | 620 Cal | $6.99 |
| 10 Piece Crispy Chicken Nuggets Combo | 950 – 1370 Cal | $8.99 |
| 5 Piece Crispy Chicken Nuggets | 310 Cal | $3.99 |
| 5 Piece Crispy Chicken Nuggets Combo | 640 – 1060 Cal | $5.99 |
| Discovery Luxe Box | 1090 – 1370 Cal | $9.00 |
| Loaded Steak And Jalapeño Fries | 470 Cal | $4.99 |
| Classic Luxe Box | 820 – 1100 Cal | $5.00 |
| Supreme Luxe Box | 1210 – 1490 Cal | $7.00 |
| Build Your Own Luxe Cravings Box | 670 – 1730 Cal | $7.19 |
| Dragonfruit Freeze | 210 Cal | $3.69 |
| Dirty Mtn Dew Baja Blast Dream Soda | 460 Cal | $2.79 |
| Dirty Soda With Baja Blast Zero Sugar | 60 Cal | $2.79 |
Best Sellers
| Food Name | Calories | Price |
| Build Your Own Luxe Cravings Box | 670 – 1730 Cal | $6.79 |
| Large Nacho Fries | 470 Cal | $3.49 |
| Nacho Fries | 330 Cal | $2.49 |
| Soft Taco | 180 Cal | $1.79 |
| Crunchy Taco | 170 Cal | $1.79 |
| Cheesy Gordita Crunch | 490 Cal | $5.19 |
| Chalupa Supreme | 350 Cal | $5.19 |
| Cheesy Bean And Rice Burrito | 420 Cal | $1.49 |
| Chicken Quesadilla | 510 Cal | $5.39 |
| Spicy Potato Soft Taco | 240 Cal | $1.29 |
| Crunchwrap Supreme | 530 Cal | $5.79 |
| Beefy 5-Layer Burrito | 490 Cal | $3.99 |
| Nachos Bellgrande | 730 Cal | $6.19 |
| Cinnamon Twists | 170 Cal | $1.49 |
Cravings Value
| Food Name | Calories | Price |
| Cheesy Roll Up | 180 Cal | $1.29 |
| Spicy Potato Soft Taco | 240 Cal | $1.29 |
| Cheesy Bean And Rice Burrito | 420 Cal | $1.49 |
| Double Stacked Taco | 320 Cal | $1.99 |
| Classic Stacker | 400 Cal | $2.19 |
| 3 Cheese Chicken Flatbread Melt | 330 Cal | $2.29 |
| Cheesy Fiesta Potatoes | 240 Cal | $2.69 |
| Chicken Enchilada Burrito | 380 Cal | $2.49 |
| Cheesy Double Beef Burrito | 580 Cal | $2.89 |
| Loaded Beef Nachos | 450 Cal | $2.99 |
Combos
| Food Name | Calories | Price |
| 10 Piece Crispy Chicken Nuggets Combo | 950 – 1370 Cal | $8.99 |
| 5 Piece Crispy Chicken Nuggets Combo | 640 – 1060 Cal | $5.99 |
| Discovery Luxe Box | 1090 – 1370 Cal | $9.00 |
| Classic Luxe Box | 820 – 1100 Cal | $5.00 |
| Supreme Luxe Box | 1210 – 1490 Cal | $7.00 |
| Build Your Own Luxe Cravings Box | 670 – 1730 Cal | $7.19 |
| Cantina Chicken Crispy Taco Meal | 880 – 1160 Cal | $9.49 |
| Cantina Chicken Burrito Meal | 970 – 1250 Cal | $11.29 |
| Cantina Chicken Quesadilla Meal | 910 – 1190 Cal | $10.59 |
| Steak Grilled Cheese Burrito Combo | 860 – 1290 Cal | $9.99 |
| Mexican Pizza Combo | 910 – 1330 Cal | $10.79 |
| Chicken Quesadilla Combo | 680 – 1100 Cal | $8.99 |
| Nachos Bellgrande Combo | 920 – 1340 Cal | $9.79 |
| 2 Chicken Chalupas Supreme Combo | 830 – 1250 Cal | $11.69 |
| Crunchwrap Supreme Combo | 700 – 1120 Cal | $8.99 |
| 3 Crunchy Tacos Combo | 500 – 920 Cal | $7.99 |
| 3 Crunchy Tacos Supreme Combo | 560 – 980 Cal | $9.49 |
| 3 Doritos Locos Tacos Combo | 500 – 920 Cal | $9.99 |
| 3 Doritos Locos Tacos Supreme Combo | 560 – 980 Cal | $11.19 |
| 3 Soft Tacos Combo | 550 – 970 Cal | $7.99 |
| 3 Soft Tacos Supreme Combo | 610 – 1030 Cal | $9.49 |
| Burrito Supreme Combo | 580 – 1000 Cal | $9.19 |
Tacos
| Food Name | Calories | Price |
| Cantina Chicken Crispy Taco | 330 Cal | $2.99 |
| Cantina Chicken Soft Taco | 260 Cal | $2.99 |
| Double Stacked Taco | 320 Cal | $1.99 |
| Soft Taco | 180 Cal | $1.79 |
| Soft Taco Supreme | 200 Cal | $2.69 |
| Spicy Potato Soft Taco | 240 Cal | $1.29 |
| Crunchy Taco | 170 Cal | $1.79 |
| Crunchy Taco Supreme | 190 Cal | $2.69 |
| Nacho Cheese Doritos Locos Tacos | 170 Cal | $2.69 |
| Nacho Cheese Doritos Locos Tacos Supreme | 190 Cal | $3.39 |
| Chalupa Supreme | 350 Cal | $5.19 |
| Black Bean Chalupa Supreme | 340 Cal | $5.19 |
| Cheesy Gordita Crunch | 490 Cal | $5.19 |
| Doritos Cheesy Gordita Crunch – Nacho Cheese | 490 Cal | $5.69 |
Burritos
| Food Name | Calories | Price |
| Cantina Chicken Burrito | 590 Cal | $5.99 |
| Chicken Enchilada Burrito | 380 Cal | $2.49 |
| Cheesy Double Beef Burrito | 560 Cal | $2.89 |
| Grilled Cheese Burrito | 710 Cal | $5.19 |
| Black Bean Grilled Cheese Burrito | 690 Cal | $4.99 |
| Bean Burrito | 360 Cal | $1.89 |
| Beefy 5-Layer Burrito | 490 Cal | $3.99 |
| Burrito Supreme | 390 Cal | $5.19 |
| Cheesy Bean and Rice Burrito | 420 Cal | $1.49 |
| Chili Cheese Burrito | 380 Cal | $3.69 |
Specialties
| Food Name | Calories | Price |
| 10 Piece Crispy Chicken Nuggets | 620 Cal | $6.99 |
| 5 Piece Crispy Chicken Nuggets | 310 Cal | $3.99 |
| Large Nacho Fries | 470 Cal | $3.49 |
| Nacho Fries | 330 Cal | $2.49 |
| Classic Stacker | 400 Cal | $2.19 |
| 3 Cheese Chicken Flatbread Melt | 330 Cal | $2.29 |
| Mexican Pizza | 530 Cal | $5.39 |
| Veggie Mexican Pizza | 460 Cal | $5.39 |
| Crunchwrap Supreme | 530 Cal | $5.99 |
| Black Bean Crunchwrap Supreme | 520 Cal | $5.89 |
| Cheesy Roll Up | 180 Cal | $1.29 |
Sides and Sweets
| Food Name | Calories | Price |
| Large Nacho Fries | 470 Cal | $3.49 |
| Nacho Fries | 330 Cal | $2.49 |
| Hidden Valley Fire Ranch Dip Sauce | 120 Cal | $0.25 |
| Bell Sauce Dip Sauce | 210 Cal | $0.25 |
| Jalapeño Honey Mustard Dip Sauce | 200 Cal | $0.25 |
| Cheesy Fiesta Potatoes | 240 Cal | $2.69 |
| Chips and Guacamole | 240 Cal | $3.39 |
| Chips and Nacho Cheese Sauce | 220 Cal | $2.89 |
| Black Beans | 50 Cal | $2.49 |
| Black Beans and Rice | 160 Cal | $2.79 |
| Pintos N Cheese | 170 Cal | $2.69 |
| Cinnamon Twists | 170 Cal | $1.49 |
| Cinnabon Delights 2 Pack | 170 Cal | $2.49 |
| Cinnabon Delights 12 Pack | 1010 Cal | $7.19 |
| Avocado Verde Salsa Sauce Packet | 50 Cal | $0.20 |
| Nacho Cheese Sauce | 60 Cal | $1.19 |
| Reduced-Fat Sour Cream | 35 Cal | $0.90 |
| Creamy Jalapeño Sauce | 230 Cal | $0.70 |
| Guacamole | 80 Cal | $1.29 |
| Chipotle Sauce | 220 Cal | $0.65 |
| Avocado Ranch Sauce | 240 Cal | $0.65 |
| Spicy Ranch | 210 Cal | $0.70 |
| Red Sauce | 15 Cal | $0.45 |
| Mexican Pizza Sauce | 15 Cal | $0.30 |
Quesadillas
| Food Name | Calories | Price |
| Cantina Chicken Quesadilla | 740 Cal | $6.49 |
| Chicken Quesadilla | 510 Cal | $5.59 |
| Steak Quesadilla | 520 Cal | $5.99 |
| Cheese Quesadilla | 470 Cal | $5.19 |
Drinks
| Food Name | Calories | Price |
| Dragonfruit Freeze | 210 Cal | $3.69 |
| Dirty MTN DEW BAJA BLAST Dream Soda | 460 Cal | $2.79 |
| Dirty Soda with BAJA BLAST ZERO SUGAR | 60 Cal | $2.79 |
| Wild Strawberry Freeze | 190 Cal | $3.89 |
| MTN DEW Baja Blast Freeze | 190 Cal | $3.89 |
| Pepsi | 380 Cal | $2.79 |
| Diet Pepsi | 0 Cal | $2.79 |
| Pepsi Zero Sugar | 0 Cal | $2.79 |
| Cherry Pepsi | 390 Cal | $2.79 |
| MTN DEW | 420 Cal | $2.79 |
| MTN DEW Zero | 5 Cal | $2.79 |
| MTN DEW Baja Blast | 420 Cal | $2.79 |
| MTN DEW Baja Blast Zero Sugar | 15 Cal | $2.79 |
| Mug Root Beer | 360 Cal | $2.79 |
| Starry | 370 Cal | $2.79 |
| G2 Gatorade Fruit Punch | 80 Cal | $2.79 |
| Tropicana Original Lemonade | 120 Cal | $2.79 |
| Brisk Mango Fiesta | 170 Cal | $2.79 |
| Brisk Dragon Paradise Sparkling Iced Tea | 120 Cal | $2.79 |
| Lipton Unsweetened Iced Tea | 0 Cal | $2.79 |
| Tropicana Orange Juice | 140 Cal | $2.29 |
| Premium Hot Coffee | 10 Cal | $2.19 |
| Hot Cinnabon Delights Coffee | 160 Cal | $2.89 |
| Regular Iced Coffee | 10 Cal | $2.19 |
| Iced Cinnabon Delights Coffee | 160 Cal | $2.89 |
Nachos
| Food Name | Calories | Price |
| Loaded Beef Nachos | 450 Cal | $2.99 |
| Nachos BellGrande | 730 Cal | $6.19 |
| Chips and Guacamole | 240 Cal | $3.39 |
| Chips and Nacho Cheese Sauce | 220 Cal | $2.89 |
Veggie Cravings
| Food Name | Calories | Price |
| Veggie Meal for 2 | 220 – 470 Cal | $12.50 |
| Veggie Bowl | 410 Cal | $7.89 |
| Bean Burrito | 360 Cal | $1.89 |
| Cheesy Bean and Rice Burrito | 420 Cal | $1.49 |
| Spicy Potato Soft Taco | 240 Cal | $1.29 |
| Black Bean Chalupa Supreme | 340 Cal | $5.19 |
| Black Bean Crunchwrap Supreme | 520 Cal | $5.89 |
| Veggie Mexican Pizza | 460 Cal | $5.39 |
| Cheese Quesadilla | 470 Cal | $5.19 |
| Cheesy Roll Up | 180 Cal | $1.29 |
| Cheesy Fiesta Potatoes | 470 Cal | $2.69 |
| Chips and Guacamole | 240 Cal | $3.39 |
| Chips and Nacho Cheese Sauce | 220 Cal | $2.89 |
| Black Beans | 50 Cal | $2.49 |
| Black Beans and Rice | 160 Cal | $2.79 |
| Pintos N Cheese | 170 Cal | $2.69 |
| Cinnamon Twists | 170 Cal | $1.49 |
| Cinnabon Delights 2 Pack | 170 Cal | $2.49 |
Bowls
| Food Name | Calories | Price |
| Cantina Chicken Bowl | 530 Cal | $7.89 |
| Veggie Bowl | 410 Cal | $7.89 |
Facts About TacoBell
Taco Bell was founded in 1962 by Glen Bell, and Glen started serving hamburgers and dogs in his first restaurant and later added tacos in Downey, California. Taco Bell is currently a subsidiary of Yum! Brands, which is also a mother company for KFC and Pizza Hut. The company can boast of winning several awards, like Entrepreneur Magazine’s Franchise of the Year since 2020 and Most Innovative Companies in 2023 and 2024.
Taco Bell App
For convenience, Taco Bell was the first American QSR to launch a restaurant app. The app provides a lot more than just viewing Taco Bell’s menu and making orders, but it also gives its consumers the opportunity to view all the Taco Bell locations, new updates, rewards, and even contacting customer service for support.
Taco Bell locations in the United States
Taco Bell in Alabama (AL)
| Location | Phone Number |
| 6650 AL-75, Pinson, AL 35126 | (205) 680-1222 |
| 5809 AL-53, Harvest, AL 35749 | (256) 886-8890 |
| 1235 AL-14, Millbrook, AL 36054 | (334) 649-8050 |
| 1560 AL-77, Southside, AL 35907 | (256) 439-8385 |
| 5920 AL-21, Atmore, AL 36502 | (251) 301-1245 |
| 2903 20th Ave, Valley, AL 36854 | (334) 203-4789 |
| 30500 AL-181 F, Spanish Fort, AL 36527 | (251) 626-6977 |
| 4623 US-280, Birmingham, AL 35242 | (205) 991-5192 |
| 5961 AL-157, Cullman, AL 35057 | (256) 734-0990 |
| 1017 Fort Dale Rd, Greenville, AL 36037 | (334) 708-1008 |
| 9050 Alabama Hwy 69 S, Tuscaloosa, AL 35405 | (205) 752-2999 |
| 1327 AL-14, Elmore, AL 36025 | — |
| 935 N Daleville Ave, Daleville, AL 36322 | (334) 245-8505 |
| 576 Gilmer Ave, Tallassee, AL 36078 | (334) 812-5770 |
| 11300 Memorial Pkwy SW, Huntsville, AL 35803 | (256) 881-3855 |
| 5005 US-31, Calera, AL 35040 | (659) 265-2875 |
| 5903 US-231, Wetumpka, AL 36092 | (334) 452-3300 |
| 1553 Montgomery Hwy, Hoover, AL 35216 | (205) 624-0952 |
Taco Bell in Alaska (AK)
| Location | Phone Number |
| 939 W Northern Lights Blvd, Anchorage, AK 99503 | (907) 276-7820 |
| 2624 E Tudor Rd, Anchorage, AK 99507 | (907) 562-2210 |
| 2351 E 5th Ave, Anchorage, AK 99501 | (907) 258-3600 |
| 9000 Lake Otis Pkwy Units 6 and 7, Anchorage, AK 99507 | (907) 868-1217 |
| 8825 Old Seward Hwy, Anchorage, AK 99515 | (907) 344-8442 |
| 43845 Sterling Hwy, Soldotna, AK 99669 | (907) 260-3555 |
| 1751 E Parks Hwy, Wasilla, AK 99654 | (907) 376-7958 |
| 12130 Business Blvd, Eagle River, AK 99577 | (907) 694-5614 |
| 755 W Rowland Memorial Way, Palmer, AK 99645 | (907) 707-1450 |
| 1390 University Ave, Fairbanks, AK 99709 | (907) 474-9526 |
| 560 D St, Fort Richardson, AK 99505 | (907) 222-1955 |
| 209 N Santa Claus Ln, North Pole, AK 99705 | (907) 490-5990 |
| 87 College Rd, Fairbanks, AK 99701 | (907) 452-3166 |
Taco Bell in Arizona (AZ)
| Location | Phone Number |
| 201 E Washington St Suite 105, Phoenix, AZ 85004 | (602) 296-4054 |
| 2465 E Baseline Rd, Phoenix, AZ 85042 | (602) 268-9189 |
| 301 E McDowell Rd, Phoenix, AZ 85004 | (602) 252-9332 |
| 110 AZ-260, Payson, AZ 85541 | (928) 474-6141 |
| 1909 W Deer Valley Rd, Phoenix, AZ 85027 | (623) 516-4776 |
| 2140 AZ-89A, Cottonwood, AZ 86326 | (928) 634-2462 |
| 13752 W Waddell Rd, Surprise, AZ 85379 | (623) 546-2500 |

Starburst is a chewy candy that comes in different flavors like strawberry, orange, cherry, lemon, and many others. This amazing candy and chewing gum are all you need to give your tongue a sweet taste it has never had before.
What is Starburst?
Starburst is a sweet candy produced in the United States by Mars. The company produces products for pet care, snacks, and foods. Starburst belongs to a category of snacks that includes other equally delicious options like 3 Musketeers, 5 Gum, Bounty, Combos, Altoids, Balisto, Doublemint, Dove, Eclipse, Ethel M, Wrigley’s Extra, Galaxy, Hubba Bubba, Maltesers, and many more. The Starburst also comes in several varieties, like the Starburst fruit chews, Starburst minis, Starburst gummies, Starburst Gummiburst, and Starburst jellybeans. Starburst candies are excellent for giving your tongue a wonderful taste and your mouth a lasting scent.
Starburst Varieties
There are over 20 Starburst varieties available to choose from. These additions came after the company realised there was a great acceptance of the Starburst the first time it was launched. Each variety has a certain ingredient that differentiate it from the others. Below is a list of Starburst varieties and their ingredients.
STARBURST Original Fruit Chews Candy
This is the original Starburst, which is chewy with a fruit flavor. Each candy is 2.07oz.
Ingredients
- Sugar
- Corn Syrup
- Hydrogenated
- Palm Kernel Oil
- Citric Acid
- Tapioca Dextrin
- Gelatin
- Apple Juice
- Modified Corn Starch
- Natural and Article Flavours
- Colors(Red 40, Yellow 5, Yellow 6, Blue 1)
Nutritional Facts
| Nutrients | Quantity | Percentage |
| Calories | 240 | |
| Total Fat | 5g | 6% |
| Saturated Fat | 4.5g | 23% |
| Sodium | 0mg | 0% |
| Total Carbohydrate | 49g | 18% |
| Total Sugar | 33g | |
| Added Sugar | 33g | 66% |
| Protein | 0g |
STARBURST Strawberry Sorbet Ice Cream Bar
Starburst is known to be a fruit chew candy, but this time it has been made for the freezer. The Sorbet Ice Cream bar is one of the best ice creams. Once the production is completed and nicely packaged, the next place for it is the freezer.
Ingredients
- Sugar
- Water
- Corn Syrup
- Skim Milk
- Mono and Diglycerides
- Guar Gum
- Carob Bean Gum
- Pectin
- Natural Flavor
- Red 40
Nutritional Facts
| Nutrients | Quantity | Percentage |
| Calories | 70 | |
| Total Fat | 1g | 1% |
| Saturated Fat | 0g | 0% |
| Trans Fat | 0g | |
| Cholesterol | <5mg | 1% |
| Sodium | 5mg | 0% |
| Total Carbohydrate | 15g | 5% |
| Dietary Fiber | 0g | |
| Total Sugar | 33g | |
| Added Sugar | 12g | 24% |
| Protein | <1g |
STARBURST Fave Reds Mini Fruit Chews Candy
Fave Reds Mini Fruit Chews Candy is a mixture of different fruit flavors. This mixture is packaged nicely in one sachet.
Ingredients
- Sugar
- Palm Oil
- Corn Syrup
- Citric Acid
- Sodium Citrate
- Pectin
- Apple Juice from Concentrate
- Mono and Diglycerides
- Confectioner’s Glaze
- Natural and Artificial Flavors
- Colors (Red 40, Blue 1)
- Carnauba Wax
Nutritional Facts
| Nutrients | Quantity | Percentage |
| Calories | 110 | |
| Total Fat | 1g | 1% |
| Saturated Fat | 0.5g | 3% |
| Sodium | 35mg | 2% |
| Total Carbohydrate | 25g | 9% |
| Total Sugars | 19g | |
| Added Sugar | 19g | 38% |
| Protein | 0g |
STARBURST Original Jellybeans Candy
This is a combination of delicious fruit flavors and a Jellybean which gives this candy the perfect taste.
Ingredients
- Sugar
- Corn Syrup
- Modified Corn Starch
- Citric Acid
- Acacia
- Sodium Citrate
- Apple Juice from Concentrate
- Natural and Artificial Flavors
- Confectioner’s Glaze
- Carnauba Wax
- Colors (Red 40, Yellow 5, Yellow 6, Blue 1)
- Mineral Oil
- Beeswax
Nutritional Facts
| Nutrients | Quantity | Percentage |
| Calories | 110 | |
| Total Fat | 0g | 0% |
| Sodium | 15mg | 1% |
| Total Carbohydrate | 26g | 9% |
| Total Sugars | 20g | |
| Added Sugar | 20g | 40% |
| Protein | 0g |
STARBURST Sours Gummies Candy
STARBURST Gummies Sours comes with tart flavors of strawberry, blue raspberry, cherry, and watermelon in each bag.
Ingredients
- Sugar
- Corn Syrup
- Apple Juice Concentrate
- Modified Corn Starch
- Water
- Gelatin
- Fumaric Acid
- Lactic Acid
- Citric Acid
- Calcium Lactate
- Natural and Artificial Flavors
- Colors (Red 40, Yellow 5, Blue 1)
Nutritional Facts
| Nutrients | Quantity | Percentage |
| Calories | 90 | |
| Total Fat | 0g | 0% |
| Sodium | 0mg | 0% |
| Total Carbohydrate | 23g | 8% |
| Total Sugars | 19g | |
| Added Sugar | 19g | 38% |
| Protein | <1g |
STARBURST AllPink Gummies Candy
Ingredients
- Corn Syrup
- Sugar
- Water
- Apple Juice Concentrate
- Modified Corn Starch
- Gelatin
- Citric Acid
- Natural and Artificial Flavors
- Mineral Oil
- Carnauba Wax
- Red 40
Nutritional Facts
| Nutrients | Quantity | Percentage |
| Calories | 90 | |
| Total Fat | 0g | 0% |
| Sodium | 0mg | 0% |
| Total Carbohydrate | 22g | 8% |
| Total Sugars | 18g | |
| Added Sugar | 18g | 36% |
| Protein | 1g |
Where to buy
Starburst varieties are available on the shelves of many supermarkets in many parts of the world and especially in the United States. If you are unlucky to have this available in your country, you can still make an online order on platforms like Amazon, eBay and Caseys.
Health benefits
While it would be tedious to have a look at the health benefits of each Starburst variety, let’s quickly isolate one and let’s have a look at its health benefits. The Starburst original fruit chew which stands tall as the popular variety, the candy is made of Sugar, Corn Syrup, Hydrogenated, Palm Kernel Oil, Citric Acid, Tapioca Dextrin, Gelatin, Apple Juice, Modified, Corn Starch, Natural and Article Flavours and Colors(Red 40, Yellow 5, Yellow 6, Blue 1). Below are the pros and cons of these ingredients.
1. Sugar
- Benefits: Sugar is a source of energy for the body. It provides quick calories and is often used for fueling physical activity.
- Drawbacks: Excessive sugar intake can lead to weight gain, cavities, and contribute to conditions like diabetes, heart disease, and obesity when consumed in large quantities.
2. Corn Syrup
- Benefits: Corn syrup is a source of carbohydrates, providing quick energy.
- Drawbacks: It is high in fructose, which can contribute to metabolic disorders, obesity, and increase the risk of fatty liver disease when consumed in excess.
3. Hydrogenated Palm Kernel Oil
- Benefits: Palm kernel oil is rich in saturated fats and can help provide texture and stability to candy products.
- Drawbacks: This oil can increase cholesterol levels and contribute to heart disease if consumed too frequently due to its high saturated fat content.
4. Citric Acid
- Benefits: Citric acid is used as a natural preservative and flavor enhancer. It can help maintain the tartness and freshness of the candy.
- Drawbacks: In large amounts, citric acid may irritate the stomach or cause acid reflux, especially for those with sensitive digestive systems.
5. Tapioca Dextrin
- Benefits: Tapioca dextrin is a starch derivative that can act as a thickener, helping to improve the texture and consistency of candies. It can be a good alternative for people with gluten sensitivities.
- Drawbacks: It’s a form of processed carbohydrate, and overconsumption can contribute to increased calorie intake without providing significant nutritional value.
6. Gelatin
- Benefits: Gelatin provides protein and collagen, which is beneficial for skin, joints, and bone health. It also contributes to the chewy texture in candies.
- Drawbacks: Gelatin is derived from animal products, so it is not suitable for vegetarians or vegans. It is also low in nutrients compared to other protein sources.
7. Apple Juice
- Benefits: Apple juice contains vitamins (especially vitamin C) and antioxidants, which can support immune health and overall well-being.
- Drawbacks: Apple juice can be high in sugar, and excessive consumption can contribute to weight gain and spikes in blood sugar levels.
8. Modified Corn Starch
- Benefits: Modified corn starch is used as a thickener and stabilizer in candies. It helps improve texture and shelf life.
- Drawbacks: It is a processed ingredient with little nutritional value, and its consumption can contribute to unnecessary calorie intake.
9. Natural and Artificial Flavours
- Benefits: Natural and artificial flavors are used to enhance taste. Natural flavors might come from fruits, herbs, or spices and offer some micronutrient benefits, while artificial flavors are designed to mimic natural ones.
- Drawbacks: Artificial flavors can cause allergic reactions or sensitivities in some individuals and may contribute to long-term health risks if consumed in excess.
10. Colors (Red 40, Yellow 5, Yellow 6, Blue 1)
- Benefits: Artificial colors help make candy more visually appealing, though they offer no nutritional value.
- Drawbacks: Some artificial food colors, like Red 40, Yellow 5, Yellow 6, and Blue 1, have been linked to hyperactivity in children and potential allergic reactions. Long-term exposure may be associated with an increased risk of certain health issues
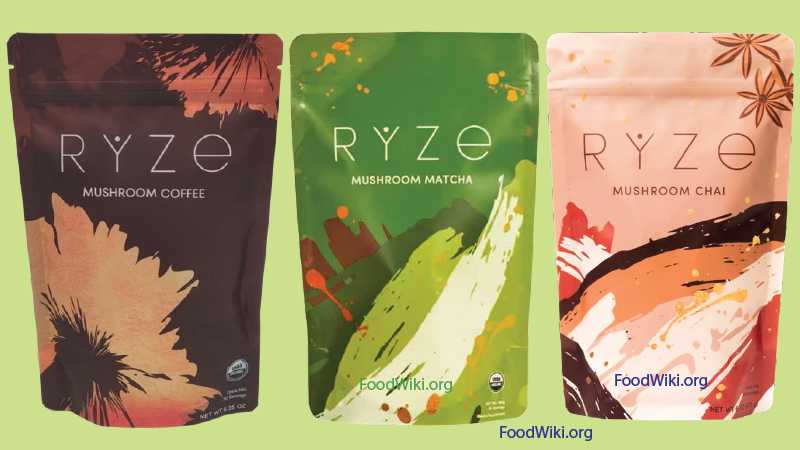
Ryze mushroom coffee is an organic, gluten-free coffee that provides a lot of health benefits. It’s not every day that you get to find organic products on the market to buy, and so we often encourage businesses that produce their products organically.
What is Ryze mushroom coffee?
Ryze mushroom coffee is powdered extract of medicinal mushrooms like Cordyceps, Lion’s Mane, Reishi, King Trumpet, Shiitake, and Turkey Tail. which are mixed with coffee in a ratio of 1:1 to give it a perfect blend of coffee and mushroom flavor. The reason why this kind of combination is important is the fact that mushrooms have historically proven to be nutritious with numerous health benefits. In World War II, people from Finland made their coffee from mushrooms and a little bit of coffee beans due to the scarcity of the commodity at the time. It was around that time that it was invented, and still in 2025, the legacy still lives on. Mushroom coffees are now growing in popularity due to the discovery people have made into it, realizing its nutritional values. Ryze mushroom coffee is produced by Ryze Superfoods in the United States. The company disclosed that all of the ingredients used to make the mushroom coffee are organic, and it sources these ingredients from California and Nevada.
Ingredients
1. Cordyceps
- Energy Boost: Cordyceps is known to help increase energy and stamina by improving the body’s production of ATP (adenosine triphosphate), which is crucial for energy.
- Antioxidant Properties: It contains antioxidants that help fight off free radicals, reducing oxidative stress.
- Immune Support: It may enhance the immune system by stimulating the production of certain immune cells.
- Improved Exercise Performance: Some studies show it may improve oxygen utilization during exercise, enhancing physical endurance.
2. Lion’s Mane
- Brain Health: Lion’s Mane is known for supporting cognitive function, improving memory, and possibly aiding in neurogenesis (growth of new brain cells).
- Mental Clarity and Focus: It can help reduce brain fog and improve focus and concentration.
- Mood Enhancement: It may have mood-boosting effects, helping to reduce symptoms of anxiety and depression by enhancing neurochemical balance.
- Nerve Regeneration: Studies suggest Lion’s Mane could promote the repair of nerve damage, potentially helping with neurodegenerative diseases like Alzheimer’s.
3. Reishi
- Immune System Support: Reishi is known for its ability to strengthen the immune system. It has adaptogenic properties that help the body respond to stress.
- Heart Health: It may help reduce blood pressure and cholesterol, contributing to better cardiovascular health.
- Anti-inflammatory Effects: Reishi has anti-inflammatory properties that may assist in reducing inflammation in the body.
- Promotes Relaxation: It has calming effects that can help reduce stress, anxiety, and promote better sleep.
4. Shiitake
- Rich in Nutrients: Shiitake mushrooms are a great source of B-vitamins, such as B2, B5, and B6, as well as essential minerals like copper and selenium.
- Immune System Boost: Shiitake contains compounds that support immune health, such as lentinans, which enhance the body’s ability to fight infections.
- Heart Health: It can lower cholesterol levels and may help reduce the risk of heart disease due to its beta-glucans and sterols.
- Anti-cancer Properties: Shiitake has been studied for its potential to inhibit cancer cell growth, particularly through its lentinans and other bioactive compounds.
5. Turkey Tail
- Immune Support: Turkey Tail is renowned for its ability to boost immune function. It contains polysaccharides that activate immune cells, helping fight infections.
- Gut Health: It supports gut health by promoting the growth of beneficial bacteria, which aids digestion and nutrient absorption.
- Anti-inflammatory: It has anti-inflammatory effects that may reduce the risk of chronic diseases linked to inflammation.
- Potential Anti-cancer Effects: Some studies suggest it may help support cancer treatments by enhancing immune function.
6. King Trumpet
- Immune System Enhancement: King Trumpet mushrooms contain beta-glucans that can enhance immune function and help combat infections.
- Antioxidant Properties: They have antioxidant compounds that help protect cells from damage and slow down aging processes.
- Liver Health: These mushrooms may assist in detoxification processes by promoting liver health.
- Support for Heart Health: They contain compounds that can help reduce cholesterol and support overall cardiovascular health.
7. Organic Arabic Coffee
- Rich in Antioxidants: Arabic coffee is loaded with antioxidants that can help reduce oxidative stress and protect against chronic diseases.
- Improved Cognitive Function: The caffeine in Arabic coffee enhances alertness, focus, and cognitive performance.
- Boosts Metabolism: Caffeine can increase metabolism, helping with weight management and fat burning.
- Mood and Energy Boost: The caffeine also stimulates the production of feel-good hormones like dopamine and serotonin, which can help improve mood and reduce fatigue.
8. Organic MCT Oil & Coconut Oil Milk
- Quick Source of Energy: MCT oil provides fast-acting energy because it is easily absorbed and converted into ketones, which can fuel the brain and body.
- Support for Ketosis: It’s ideal for those on a ketogenic diet as it helps the body maintain ketosis, promoting fat burning for energy.
- Cognitive Benefits: MCT oil has been shown to support brain function and may help in reducing cognitive decline.
- Gut Health: Coconut oil contains lauric acid, which has antimicrobial properties that may support gut health and fight infections.
- Weight Loss: MCT oil can help control appetite, making it easier to manage weight by reducing hunger.
These ingredients combine to give the body what it needs the most like A boost in metabolism, A better sleep, Healthy digestion, Immune support, Energy and many others.
What are the nutritional benefits?
Ryze Mushroom Coffee is 100% vegan and contains several nutritional benefits, including what I have listed in the table below:
| Calories | 15 |
| Total fat | 1g |
| Saturated fat | 1g |
| Trans fat | 0g |
| sodium | 0mg |
| Total Carbohydrate | Less than 1g |
| Protein | 0g |
How to prepare
- Scoop one to two tablespoons of Ryze mushroom coffee.
- Pour the powder into 9-11 oz of hot water and stir.
- You can add milk to it to improve the taste and nutrients.
Design
Packaging is important in describing what can be found in it and whether it’s a premium or just a low-budget product. Big brands often ensure to get the best packaging possible, and in the case of Ryze mushroom coffee, it’s sealed in a 6.35 oz. sachet colored with coffee color to enable consumers to feel the vibe. The downside of Ryze’s package is that it does not portray a picture of mushrooms and coffee, but rather a picture of a flower drawn on it.
Price and where to buy
Ryze mushroom coffee is quite popular on the market; therefore, locating it on various supermarket shelves shouldn’t be a problem. Amazon, eBay, and Walmart also sell Ryze mushroom coffee. Below is a table that shows the price of Ryze mushroom coffee on each platform.
| Ryzesuperfoods.com | $27 |
| Amazon | $29 |
| eBay | $34 |

Ryze food products
Ryze produces a wonderful number of other organic products besides the mushroom coffee.
Mushroom Chicory

This is caffeine-free coffee, and it’s made up of chicory root and a 6-mushroom blend.
Nutritional Facts
| Calories (amount per serving) | 23 |
| Total Fat | 1g |
| Saturated fat | 1g |
| Sodium | 3mg |
| Carbohydrate | 2g |
| Dietary Fibre | 1g |
| Sugars | 0g |
| Protein | 0g |
| Potassium | 20mg |
Mushroom Chai

RYZE Chai is packed with 6 adaptogenic mushrooms and warming Ayurvedic spices.
Mushroom Hot Cocoa
100% organic cacao with no added sugar.
Superfood Creamer

100% organic superfoods, hydrating coconut water, and one billion CFU of probiotics
Nutritional Facts
| Calories (amount per serving) | 35 |
| Total Fat | 1.5g |
| Saturated fat | 1.5g |
| Trans Fat | 0g |
| Cholesterol | 0mg |
| Sodium | 0mg |
| Carbohydrate | 5g |
| Dietary fibre | 0g |
| Sugar | 3g |
| Protein | 0g |
| Calcium | 10mg |
| Iron | 0.6mg |
| Potassium | 120mg |
Mushroom Matcha

The product is made of six mushroom blends, blue spirulina, coconut milk powder, organic MCT oil powder, and organic Himalayan pink salt.
Nutritional Facts
| Calories (amount per serving) | 25 |
| Total Fat | 2.5g |
| Saturated fat | 2.5g |
| Trans Fat | 0g |
| Sodium | 0mg |
| Carbohydrate | 1g |
| Protein | 0g |
Mushroom Coffee VS Traditional Coffee
The mushroom coffee and the traditional coffee, which is made out of only coffee beans, have their individual advantages. Before the invention of mushroom coffee, the world only knew of the traditional coffees. The mushroom coffee originated in Finland during World War II and became popular when people noticed the enormous health benefits it possesses. The mushroom coffees are made out of a blend of coffee beans and an extract of medicinal mushrooms like Cordyceps, Lion’s Mane, Reishi, Shiitake, Turkey Tail, King Trumpet, and others. This combination even gives some coffee taste resemblance but does not give a true taste like the traditional coffee, which is composed of about 90% to 100% coffee. If you seek my opinion, mushroom coffees are great for medicinal purposes, while traditional coffees are great for recreational use.
Frequently Asked Questions
Does Ryze mushroom coffee contain caffeine?
Yes, this product contains 48mg of caffeine, which is less than what you would find in a regular coffee.
Do these products contain any additives?
Additives are substances added to food or products to enhance their flavor, appearance, shelf life, or other properties. While many additives are generally regarded as safe by food safety authorities, their impact on human health can vary depending on the type, quantity, and frequency of consumption. However, Ryze mushroom coffee does not contain any additives at all.
Is this product organic?
Yes, one of the reasons why this product does not contain any additives is that they are organic.
Who is this product not good for?
This product is not recommended for people allergic to caffeine, pregnant or breastfeeding mothers.
Where can I buy this product?
If you want to buy this product from Ryzesuperfoods’ official website, it is possible but they only supply within the United States. If you live outside of the United States, like Canada, United Kingdom, Australia, Germany, Mexico etc. then you should probably consider making your order on Amazon and eBay from third party sellers who are ready to ship to your destination.


-

 Drinks3 weeks ago
Cody’s Vody energy drink contains up to 18% alcohol
-
 Drugs3 weeks ago
Almased Ingredients And Honest Review
-

 Drugs3 weeks ago
Omega XL Ingredients and Honest Review
-
 Food3 weeks ago
Cheetos Snacks Ingredients and Honest Review
-

 Food3 weeks ago
Soursop | Fruit, Types, Health Benefits
-
 Food3 weeks ago
Yoohoo Drink Ingredients and Honest Review
-

 Drinks3 weeks ago
Bullet Vodka Mixed Drink, 18% Alcohol, Ingredients and Price
-

 Food3 weeks ago
Sour Patch Kids Ingredients and Honest Review
You must be logged in to post a comment Login